Build a radio telescope at home
Summer project: Build a radio telescope at home
When we moved into our house more than 7 years ago now the old owners left their Dish Network satellite TV dish attached to the roof. A few months later we got a sternly worded letter from the Disk Network demanding that we send them the dish back. With my detailed knowledge of the intricacies of the American legal system my obvious response was: come and get it. Which would have been fine with me. But, actually, that was not even my response, my response was to throw the letter in the trash while thinking in my head "come and get it."
Seven year later the dish was still on the side of the house. Luckily it is on the side that I never really see, so I didn't worry about it, but every now and then I thought to myself: "I should at least go up and take down that eyesore." But I never did. Until now.

I occurred to me a while ago that a parabolic dish like that would make a fine radio telescope (OK, it will end up a microwave telescope, but we'll get into the details later).
I'm not a radio astronomer or an electrical engineer or a Ham radio guy or any of that stuff, so I really had no idea what I was talking about, but it seemed a fun project for Lilah and I to play around with for the summer and for both of us to learn a little bit about microwaves. The caveat, though, is that my electronic explanations might not be exactly right. And I might break things.
We started last week. Step 1: remove the dish from the roof and see what was there. I had to snip the coax cables that went into the house and then undo five big screws and then everything just came unceremoniously down. The main issue was figuring out how to hold the wrench, dish, and ladder at the same time without falling. Luckily I survived this crucial part. Lilah stayed far enough away to avoid getting a dish on her head but to be able to both take pictures of me and make fun of me each time I dropped something and had to go pick it up.

The next step was to figure out what I really had. The dish itself is just a big semi-parabolic shaped piece of metal that focuses all of the microwaves into one spot. I wanted to see what was at the spot where the microwaves converge. Something, somewhere has to take the microwaves and turn them into an electrical signal that can travel down the coaxial cable. Given that coaxial cables come out the bottom of the arm, it must be that the conversion all happens right there on the end of the arm.

Here's the thing at the end of the arm. If you take the white plastic cap off (forgot to take picture; sorry!) you're looking into two things that look like funnels. I recognize those; they are "feedhorns" which really are, essentially, the funnels that will take the focused microwaves and transmit them somewhere, presumably to something inside that grey box. The grey box has, as outputs, three coaxial cables. It seemed obvious that the two feedhorns look in two slightly different directions, allowing a single dish to actually look at two TV satellites at the same time. In fact, they are labeled "119 degrees" and "110 degrees" so they presumably look at two satellite 9 degrees apart (verified.here are the TV shows you can watch on them.) One of the satellites, apparently, transmit microwaves that are polarized both up-and-down and also back-and-forth, meaning that you get twice as much TV from one satellite. The other satellite looks like it doesn't. Why not? I have no idea. But it does look like Satellite 119 (which two polarizations) is called the Main Satellite by the Dish Network and has more channels. So at least that makes sense.

The gray box is clearly the heart of the microwave receiver. From the label, it is a Digital LNBF. As I mentioned, I don't know any of this stuff. But, a judicious use of Google taught me that it stands for Low Noise Block Downconverter with Feedhorn. We've already found the feedhorn part, that just channels the microwaves into the box, so somewhere in there there has to be an antenna which actually detects the microwaves, not just moves them around, like all we've done so far.
I really wanted to see the antenna (three of them, actually, one for each polarization). So we started taking the box apart.

Sadly, most of the electronics are hard to get to and we never found the antenna. I can show you, however, what the inside of someone else's LNBF looks like. From Wikipedia, here is the LNB part of an LNBF. Imagine that the feedhorn is pointed straight at you and the microwaves are going into the feedhorn and into that empty circle in the upper middle. See the two thick wires sticking out, one horizontal and one vertical? Those are the antennae. The vertical ones will detect microwaves that are vertically polarized, the horizontal ones will detect the horizontally polarized microwaves. Just like you can use polarized sunglasses to remove one polarization from sunlight, the two antennae each will detect only that single polarization and the other will be invisible to it. Again, it's almost like having two separate satellites in the same spot.
Ever thought much about how an antenna works? They're quite simple, really. Microwaves, radio waves, light waves, and all of the rest are traveling electric and magnetic fields. These are "microwaves" because the size of the wave -- the range of distance over which the electrical field goes from positive to negative -- is a few centimeters. Imagine now that little wire -- the antenna -- sitting inside this electric field. If the antenna is about the size of the electromagnetic wave, one end of the antenna will get a positive charge, the other end a negative charge. Current will flow. You have just detected the radio wave. What if, instead, your antenna is really small compared to the wave? The change in electrical field across your antenna is tiny, so only a tiny charge flows. Nothing really happens. What if, instead your antenna is big compared to the wave? In that case you'll have many alternating positive and negative fields, but they will mostly cancel. Bad news. You detected nothing. The moral of this story is that you want your antenna to be about the same size as your wave (there are many details I am skipping here). And notice, the picture above, the antennae look to be something like a centimeter. Perfect for detecting the microwaves we're after.
From detecting the microwaves to sending the signals out the coaxial cables at the bottom is where the magic occurs. We have just received electrical signals on the antenna, but we can't send those directly down the coaxial cable. Why not? My lack of electrical engineering knowledge hurts me here. I know that microwaves have too high a frequency (or too short a wavelength) to transmit on coaxial cables without dying out incredibly quickly. But, I am sad to admit, I can offer you no intuitive explanation of why. I'll work on it. But the bottom line is that to transmit on a relatively cheap and simple coaxial cable you need to lower the frequency. That's where the "downconverter" part comes in. All of those electronics you see in the box take the microwave frequency detected, subtract a fixed frequency just a little smaller, and leave only low frequency oscillations that can travel down the coax. I understand the principle, but I'm not so good on the details.

If you want to watch TV, then, just point at the satellite, focus the microwaves, send them through a feedhorn, convert the microwaves to lower frequencies, send them via coaxial cable to your satellite receiver, and watch all you want.
One small technical point that will matter in a few minutes is that the electric power needed to run the LNBF is sent up from your satellite receiver on the same coaxial cable. This matters to us, since we're not going to have a satellite receiver and will need to construct our own power source.
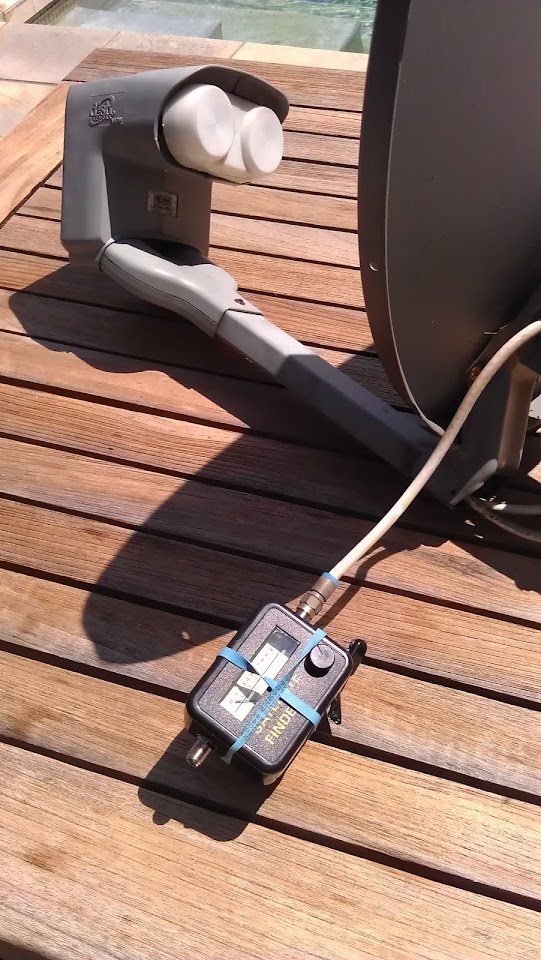
We now know how our radio telescope is going to work. We'll point at an object, focus the microwaves with our dish, collect them in the feedhorn, convert them to lower frequencies, and then detect them. For TV you have to receive and decode them, but for us, all we want to do is detect their intensity. Luckily, this is a problem that TV watchers often have, too. When they want to align their satellite dish they need to find the satellite. The easiest way is to insert a "satellite finder" between the dish and the TV which simply measures the total amount of microwave received. You then tweak your dish around until you get the maximum signal.

You can buy fancy ones of these for $100+, but, for fun, I thought I would try something cheap, so I found this one on Amazon for $7.91 (including free Prime shipping; whoo hoo!). It has two coax inputs. One goes to the receiver, one goes to the LNBF. There is a meter, a buzzer (very useful, it turns out; the Amazon page didn't even mention it!), and a gain knob.
Recall that the LNBF gets its power from the TV receiver. This thing also gets its power from the receiver. It's the only reason for the coax to the receiver, in fact. If I had a satellite TV receiver, I could probably have just hooked it up straight and start using the dish. But I don't. So I need to power it myself. How?

The specs on the satellite finder where nearly nonexistent, but on the back (which, by the way, was easy to pop off), you could read: "Power ~13-18 V"
I like the "~" which gave me some comfort that I might be able to just wire something up quickly and perhaps the circuit wouldn't complain too much. The easiest thing I could think of to get a voltage in that range was two 9V batteries wired in series. Is this a good idea? I have no idea. You could, alternatively wire up ~10 AA batteries (at 1.5 V each) in series. Is this better? I have no idea.
It seemed easiest to me to do the 2 9V batteries, so Lilah and I headed down to Radio Shack and, for ~$3, got a bag of 9V connectors.


We wanted two batteries in series, so I connected the red (+) wire of one to the black (-) wire of the other. I soldered them together, but, really, that's over kill, isn't it? Just twisting and wrapping in electrical tape would probably be fine. Now we just need to figure out where to put the power in.
When you pop off the back you see this:

It's pretty easy to figure out where the power needs to come from. The only point of the coax from the receiver is to deliver that ~13-18V, so if we deliver it by battery instead we should be in business. On a coaxial cable the outside is ground (-) and the inside wire is the power (+), so we need to hook up our batteries appropriately. It's pretty easy to see what is connected to the outside and inside of the coax.

I did a simple soldering job connecting the red wire of the battery pack to the thing labeled "power input" above and connecting the black wire to the thing labeled "ground". Soldering! The smell reminds me of my father. Until recently I had his old soldering gun, but it, too, finally stopped working. Lilah loves it, too. I'm not quite bold enough to let her solder herself, but I think the time is quickly approaching. We talk a lot about proper technique, heating the wire, not the solder, checking the connections afterward with the voltmeter. I think she's ready.

The final product looks just fine. Red wire to the middle pin, black wire to the outer ground. I drilled a hole in the plastic back to allow the wires to pass through, and we got out the batteries for the moment of truth. What would happen when we plugged the batteries in? We really weren't sure. Smoke? Flame? Probably not. Nothing? Hard to say. So we did it. And here's what happened: a light came on on the front side! I didn't realize it, but the meter was backlit and we had just turned on the back lighting. We were powered, there was no smoke, and nothing seemed to be overheating! If I turned up the gain know I could eventually even get to a point where the buzzer was buzzing. It was time to try our microwave telescope!
All we had to do at this point was to go outside, attach the coax cable coming from the LBNF (there are two, actually, since they were originally attached to the two polarizations of the 119 degree satellite. Things in the sky are in general not polarized so it doesn't really matter which I used). And starting trying to find something. It looks something like this. The blue rubber bands hold the two batteries in place on the back. Quite professional, I know:
We turned the gain knob down until no sounds were being made and then I had an idea. The feed horn itself is like a tiny telescope, right? The dish just is a way to feed it even more microwaves. But shouldn't the feed horn detect thermal emission from something about 100F? Like, say, my hand? And the answer is, yes. When I put my hand in front of the feed horn the satellite finder started buzzing slightly. Lilah and I both yelped. Regardless of whatever else was going on, our feedhorn had just detected something when I put my hand in front. She put hers in front. Same sound. We were ready for astronomy!

Lilah and I had been talking about radiowaves and microwaves and how they were related to radios and to light and to things in the sky, so I asked her: "Lilah, what do you think would be the brightest thing in the sky in the microwave." "Well, dud, Daddy, it will be the sun," she said. She was right (well, almost). Unfortunately, for our first day of radio telescoping, we hadn't yet built a mount for the dish, so we used me.
I looked up, pointed the dish in the direction of the sun, and..... nothing. I waved it around, up, down, back, forth..... Nothing.We retested our hands: good. I pointed at the side of the house: good. But up in the sky there was nothing to be seen or heard.
Curious, I pointed all around the sky. When I started scanning south, the buzzer started going crazy now and then. I had just found the geosynchronous satellites broadcasting in the microwave. In fact, I was pointing in more or less the direction that our own dish had been pointing before I had removed it from the side of the house. I might have found the 119 degree Dish network satellite, even.
Knowing that we were capable of finding something I tried even more systematically for the sun. With Lilah helping to line up, we pointed right at the sun and slowly spiraled out, until, all of the sudden BUUUUUZZZZZZZZZZZZZZZZZZZZZZZZZZZZZ!!!!!! First light! We had detected something beyond earth orbit. When I looked where I thought we were pointing I realized the problem: the feedhorn was offset from the center so that the dish could look at two satellites at once. We will be addressing that difficulty later. But the exciting thing about how hard it was to find the sun is that it means our dish is quitedirectional. It must be precisely pointed, even at something as bright as the sun.
We listened to the buzz of the sun's microwave emission for a while, while bathing in the shorter wavelength light of the sun also, feeling very proud of ourselves:

This is just the start of our summer project. We have proved to ourselves that we can repurpose the TV dish to detect things other than TV satellites (and we can detect those!). There is so much more to do. Here are the first few tasks we have:
- Build a mount. Really. I am not that steady. A good mount will allow us to really explore the sky and see what is there.
- Connect it to the computer. Right now we have a meter and a buzzer, which is good to see if things are working, but not so good for more quantitative exploring. I think connecting the buzzer to the microphone input of a laptop and then analyzing the signals might be doable.
- See what else is in the microwave sky. The moon seems a likely target, because it is big and moderately hot. Venus? It's hot, but not so big, so I don't know. Other things? We'll found out.
Our telescope is crude, but I think both Lilah and I learned some stuff we didn't know before, which is always the goal. Plus we will have more of the summer to see what we can really find out there. We spent $7 on the satellite finder, $3 on the battery connectors, and got a dish for free. Looking at ebay it appears you could get a dish+LBNF for under $100. Go out and explore the microwave sky!


Comments
Post a Comment